Sunday, April 24, 2011

Easter Tutorial :)


As a Easter treat for all my blog-friends, I put together the soap-cozy tutorial (improved recipe!). Why not?! Soap, eggs, bunnies, chocolate, chicks, all random sweet little things, all very "Eastery" :) Besides, spring is officially here and I think this small project is indeed very Spring appropriate! So here it is! Happy hooky-Spring-Easter-time!!

 Work 8ch and join with slst forming a ring. 6ch (counts as 1dc,3ch)

[1dc,3ch] 7times. Join with slst into 3rd of 3ch. You should have 8 dc each separated by 3ch.

Change colours. (If you fancy). Join new colour to any 3ch space. Follow the picture instructions. Repeat in all 3ch spaces until you make 8 petals. At the end do not join.

8 petals!!

Without joining the last petal, 5ch.

Very important step now! You'll be working on the reverse of your flower! Follow the pictures.


See? You building the foundations where your second row of petals will go. Clever!

This is a view of the reverse of your flower. You should have 8 5ch loops!
Now we start work on your 1st 5ch loop do make the 1st of 8 petals. Follow the picture.

8 petals on the 2nd row of petals? perfect!
Now, do not join and 7ch.

Just like before, work 8 loops, behind each petal, this time of 7ch each loop.


Work your 3rd row of petals. Follow the pictures.

Ta-DAHHH!! Lovely flower!! Now start all over again and make another one! (yep, I'm serious!)

OR, just play around with your masterpiece! Find it new purposes ;)


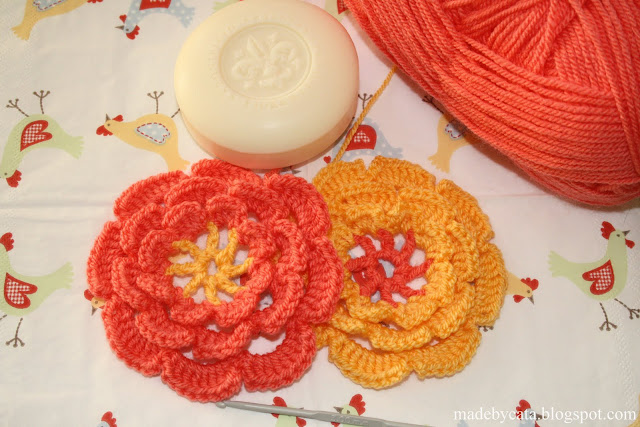
I made two (Lola didn't really like the new hat...)


Now just have to figure out how I'm crocheting them together around a soap!.....hum...

But before, I'm going to play a bit more with my flowers :)
See how they match the flower arrangements I have in the house?


Ok, back to work now!
What I did was a row of sc all around the back of each flower, and on top of it a row of dc. Like this:


Then a row of slst joining the two flowers, with my lovely-smelling soap in the middle :)
Happy-happy spring teamed Crochet!!


And now back to more playing! Weeeeee!! I love matching my buttons with my projects!


Lots of Love, Cata****


Thursday, April 21, 2011

New bags on the block!

I made (nearly) 2 new bags today! I have two late-very late- birthday presents to send home!
  The "Japanese Dolls" fabric is from mwendas on Etsy. She has some sweet stuff!! The purse frame is the last of the set of 5 I bought. I will miss them...:( I made the pouch like the others I Blogged about. See the tutorial here. Then I had the idea of using snaps to hold the pouch on to the bag like this. I'm liking it! ;) 


Paco having a sniff at it :D


This next bag is a really special one and it was soooo much fun to make! It was my first waterproof fabric sewing experience and...I loved it!! I love the way it feels under the needle and the way it holds its weight when it's done. So cool! I'm not sure what to do regarding handles yet...Ummm....


Clashing lining is my religion :)


The Summer is arriving, I have worn my first last-summer's clothes and for the first time this year, flip-flops! I'm dreaming with the idea of having a handmade bag for each of my Summer outfits!....;)
Lots of Love, Cata****

Sunday, April 17, 2011

Other Purses


I've been making this purses and I'm smitten by them! I have bought this lovely Heather Bailey fabrics a few weeks ago and was looking for a special project for them. I bought the fabrics on Etsy. Can't remember in what shop, but many fabric suppliers do Heather Bailey fabrics. The purse frame is from Etsy too, from this shop called bagpurseframes. They have lovely stuff, can't wait for my next purse-project! The pattern is a "free adaptation" (Ahem!....sorry, you know me now, right? me and following instructions?...yep!...) of this tutorial by lovely Lisa of U-handblog! I have a serious crush on her and all her creations! The tutorial was very useful and I just adapted it to the shape and size I thought looked better for my frame. The only problem was that I didn't realize I had to buy specifically a NON-sewing frame! The tutorial is for gluing the purse into the purse frame! Because I'm such a newbie and, ok I admit, also because I'm rubbish at following any type of instructions/suggestions/rules/u-name-it, I end up making this type of mistakes!! The purse frames I bought are to be sewn to the material!! Hence the little holes on them, see? I tried to use my fantastic and very expensive glue on them (oh Yah, I had bought the glue and all!) and guess what happened? Glue squirting trough the little holes! Fun!! But fear not, my friends! I couldn't find any tute on sew-on purse-frames so I just improvised and this was the result. I must say I quite like the way you can see and match the colour of the stitches with your fabric! It was tricky alright, trying to sew and keep the frame in place (you can't pin it in place!). Also pierced my poor finger badly! (thimbles just too big for my fingers, had to sellotape the thimble on!Ha!) But all worth it and after making - and learning the hard way! - with the 1st one, I was flying! So, I have put together a few useful tips for making this type of purse. Between mine "what-not-to-do's" and Lisa's "what-to-do-if-you-smart" you'll make yourself the perfect, easiest purse ever! Ha! Good luck!!

I used Lisa's tips to work out the pattern for my frame. Its important to get the points A and B right! Then I used the pattern to cut 2x exterior fabric, 2x lining, 2x iron-on interfacing and 2x fleece.
Iron the interfacing on to the wrong side of the exterior fabric.
 Right sides touching, sew from A to B around the bottom of the purse.
 Set aside.


Make a sandwich with the lining pieces - right sides touching - and the 2 fleece pieces on the outside.


Sew it from A to B but! this time leave a gap on the bottom! (my gap was 4 fingers wide)


Turn the exterior purse Right side out. Pop it inside the lining. (fleece side out)

Push one inside the other for a perfect fit. Make sure the edges match perfectly all around! Sew all around the top (if you can). I left the corners A and B to hand sew, because it looked better. (and because I coulnd't make it any other way!)

Push the exterior lining trough the gap of the lining. It's the birth of a gorgeous purse!! Congratulations! 

At this point you'll think "oh no!! I did it all wrong!" Don't worry! It will work out! I haven't figure out quite yet how all this "the reverse of the wrong side inside the inside-out pushing trough the inside out of the reverse" works, but it does!! Hurray for Lisa Lam!!
(ps: don't worry if it's all wrinkles! It should iron out easily)


And after sewing the frames on, this is how my purses look like :) I love them!!


Hope you like them too and feel some purse-love inspiring you!
Lots of Love, Cata****


Wednesday, April 13, 2011

The 2nd sewing project :)

      Another small clutch :)  What you think of my yummy Heather Bailey fabrics?!


Lots of Love, Cata*****